How to set up and use BigTest for Windows users (using Linux virtual environment)
- Taras Tkachenko
- Dmitry
Why do we Need This
BigTest testing framework cannot work on Windows OS due to several causes:
- It uses deprecated and non-supported for now libraries and components like PhantomJS (which never worked on Windows from the time it was created);
- It creates UNIX-specific symbolic links which are absent on Winows (FAT/NTFS) and Windows shared (SMBFS/CIFS) file systems;
- Despite it uses PhantomJS as a shadow renderer it cannot work in headless mode - it requires normal UI browser to run.
It makes us impossible to run BigTest not only on Windows but from the shared host machine folders on virtual environments as well.
At the top of this we cannot use it on headless server OS under any VM according to point 3 from the previous list above.
So the basic idea is to set up Linux virtual environment (using VirtualBox in this case) which contains UI-enabled OS and set all the Node development infrastructure there.
Codebase will be available in 2 ways:
- via git operations (when clonning and pulling project codebase);
- via bulk copy from CIFS shared dir of your projects home on Windows and vice versa (this will help us to avoid too many commits in the branch).
Step by Step Guide
So while the root causes are defined and approaches are pointed out, let's do it step by step.
- Install VirtualBox (if you'd not done it already):
- Download the latest version of Virtualbox from here: https://www.virtualbox.org/wiki/Downloads;
- Download VirtualBox Extension Pack from here: https://download.virtualbox.org/virtualbox/6.0.8/VirtualBoxSDK-6.0.8-130520.zip (or newer depending on your VirtualBox version);
- Install VirtualBox and Extension Pack according to VirtualBox installation guide;
- Create VBox VM with the following settings:
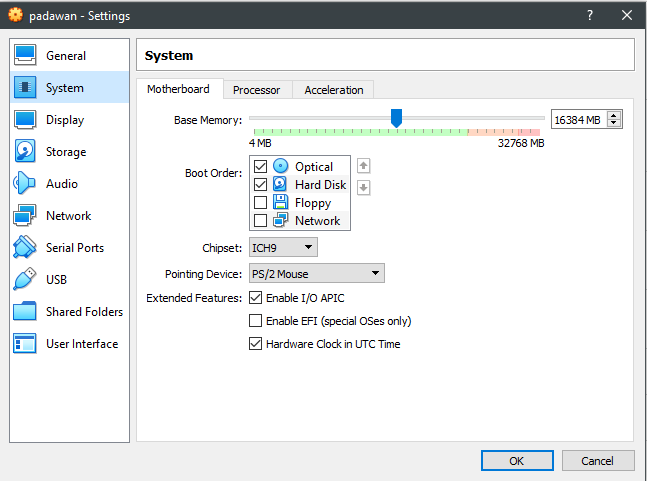
- Architecture: x86_64 (see Figure 2);
- Chipset type: Intel ICH9 (see Figure 2);
- Memory: 8GB+ (16GB in my case, see Figure 2);
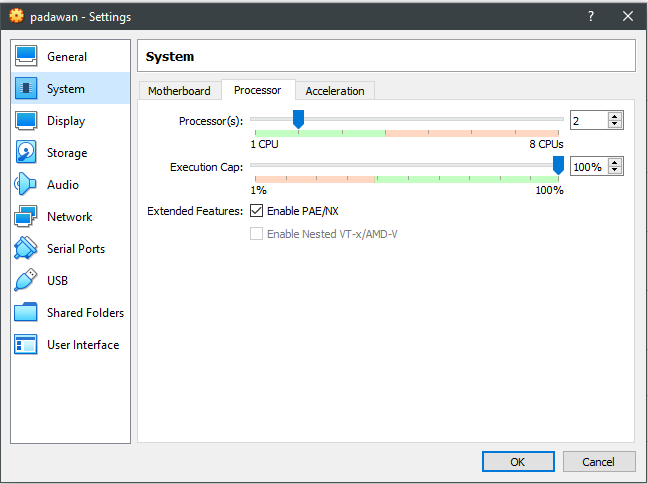
- Processors: 2, accelerations: ON (see Figure 3 and 4);
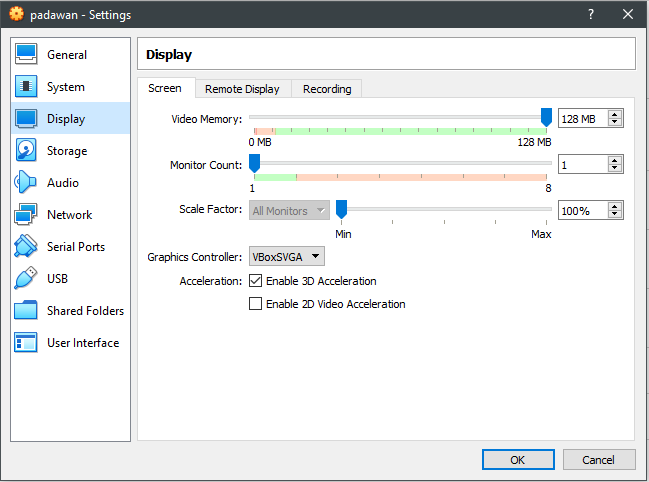
- Video settings: Memory: 128MB, 3D acceleration: ON (see Figure 5);
- Disk space: WDI, 40GB, disk type: Fixed (it is faster than dynamic while takes more space);
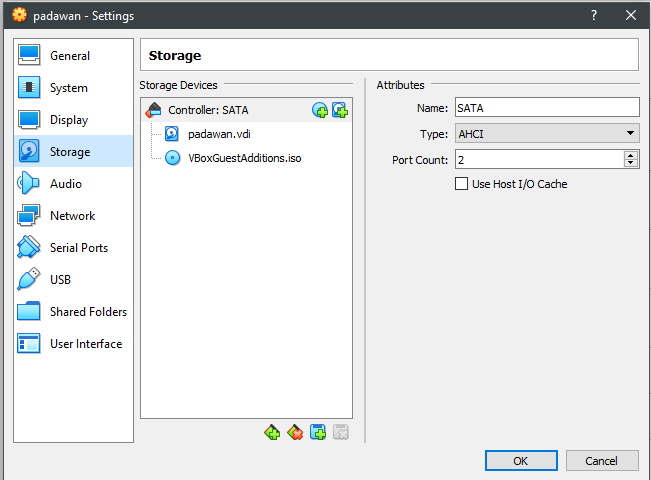
- Block devices config: SATA only (see Figure 6);
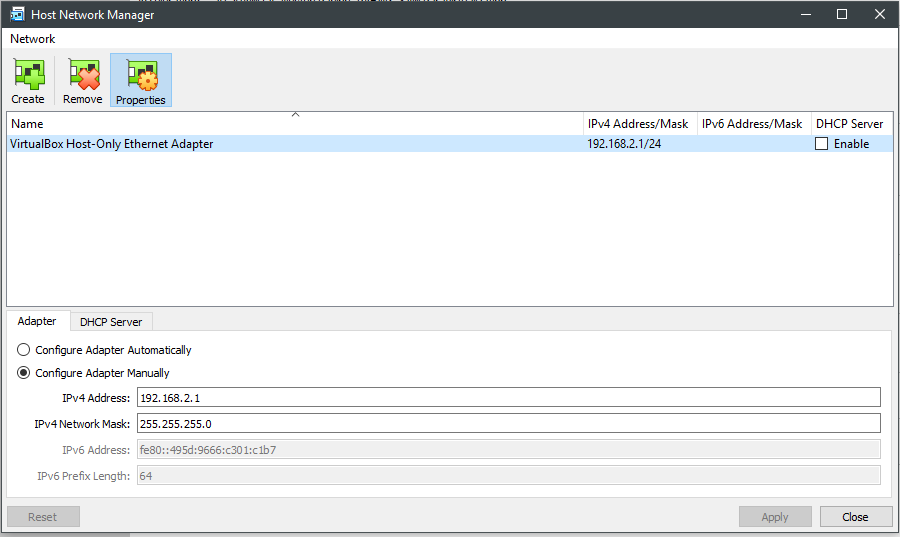
- Host only network (for ssh access): Internal router IP: 192.168.2.1, Netmask 255.255.255.0, DHCP: OFF (see Figure 10);
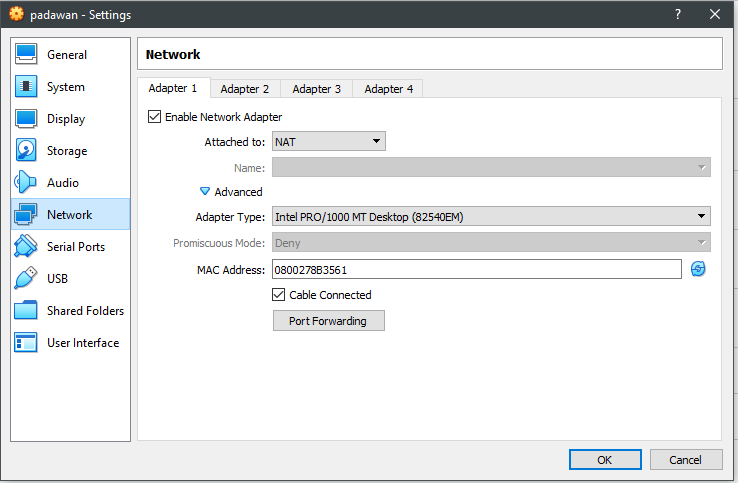
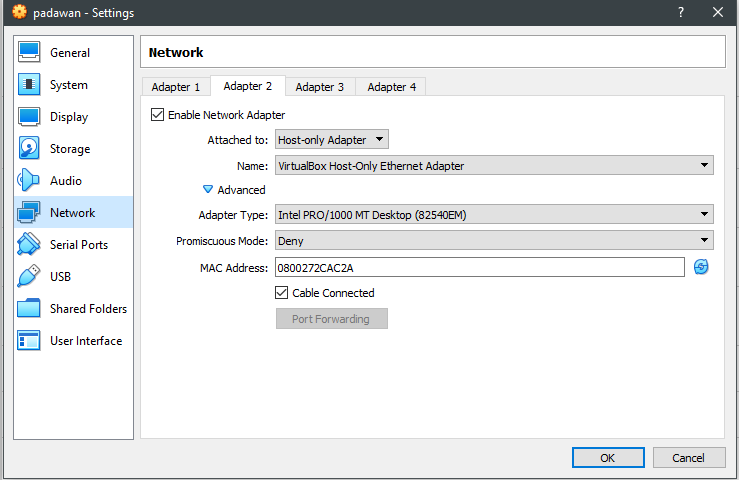
- Network adapters: 2 x Intel PRO/1000 MT Desktop: 1 - NAT (for external network bridging), 2 - Host-Only Adapter (for SSH access and the like) (see Figures 7 and 8);
- Install Ubuntu (in this guide, you can use your own distro):
- Default installation options could be used.
- Install Linux packages required:
Update repos list and upgrade your distro:
Update your distro$ sudo apt update && apt upgrade -y .............. $ sudo apt dist-upgrade -y
Install prerequisite packages:
Prerequisites$ sudo apt install -y aptitude mc ubuntu-restricted-extras build-essential git tig crl lynx links dkms inux-headers-generic linux-headers-$(uname -r)
- Install VirtualBox Guest Extensions (according to these guides: https://www.tecmint.com/install-virtualbox-guest-additions-in-ubuntu/, https://www.techrepublic.com/article/how-to-install-virtualbox-guest-additions-on-a-gui-less-ubuntu-server-host/):
- Insert VBox Guest Extensions ISO into VM CD drive;
Become a root and mount Guest Additions ISO into your VM and change to its directory:
$ sudo su -
$ mount /dev/cdrom /media/cdrom
$ cd /media/cdrom
Install the Guest Additions package with the command:
$ ./VBoxLinuxAdditions.run
- Install Java:
you can install OpenJDK and OpenJRE or Oracle Java (according to this guide: https://www.digitalocean.com/community/tutorials/how-to-install-java-with-apt-on-ubuntu-18-04):
$ sudo apt install default-jdk default-jre
- Install Google Chrome browser (using this guide: https://askubuntu.com/questions/510056/how-to-install-google-chrome):
Download and import APT key:
$ wget -q -O - https://dl-ssl.google.com/linux/linux_signing_key.pub | sudo apt-key add -
Install Chrome repository:
$ echo 'deb [arch=amd64] http://dl.google.com/linux/chrome/deb/ stable main' | sudo tee /etc/apt/sources.list.d/google-chrome.list
install Chrome browser:
$ sudo apt update
$ sudo apt install google-chrome-stable
- Personalize your new browser as usual by introducing your Google account and synchronising it (it will bring all your development extensions you usually have on host machine).
- Install NodeJS environment (according to these guides: https://itsfoss.com/install-nodejs-ubuntu/, https://websiteforstudents.com/install-the-latest-node-js-and-nmp-packages-on-ubuntu-16-04-18-04-lts/):
Download APT repository installer for NodeJS version of your choice (let it be 11.x for example):
$ curl -sL https://deb.nodesource.com/setup_11.x | sudo bash -
Set up NodeJS & NPM:
$ apt update && apt install nodejs
# checking installed versions:
$ node -v
# v11.6.0
$ npm -v
# 6.5.0-next.0
Update your NPM installation and install all the Node global packages needed:
$ sudo npm i -g npm
$ sudo npm i -g yarn@latest babel-cli@latest babel-preset-env@latest webpack@latest webpack-dev-server@latest eslint@latest create-react-app@latest pm2@latest json-server@latest express@latest typescript@latest
- Install FOLIO development environment (using this guide: https://github.com/folio-org/stripes/blob/master/doc/quick-start.md):
Change to your local user (not root!) home directory, generate your VM's SSH ID and list your public key file contents to the terminal:
$ cd ~
$ ssh-keygen
$ cat ./id-rsa.pub
- Copy the key from terminal and register it in your FOLIO GitHub account.
Set up FOLIO Yarn repository and install Stripes globally:
$ yarn config set @folio:registry https://repository.folio.org/repository/npm-folio/
$ yarn global add @folio/stripes-cli
Create your VM projects dir within your users home directory to run and debug your tests from it (/home/username/workspace in my case):
$ mkdir ~/workspace
$ chmor -R 775 ./workspace
- Clone your app or Stripes platform from Github repo and follow the instructions on app or platform installation from the guide above. Example related with Stripes workspace and modules ui-eholdings, ui-notes and ui-quick-marc
- Go to folder without subfolder "stripes"
- Run "stripes workspace"
- Select by space items ui-eholdings, ui-inventory, ui-notes, ui-quick-marc, ui-users, stripes-sample-platform
Press Enter. The result:
Create file stripes-sample-platform/.stripesclirc
- Update stripes-sample-platform/stripes.config.js:
- Update stripes-sample-platform/package.json
- Run "yarn stripes platform clean --removeLock"
- Run "yarn install"
- Run "yarn stripes serve --okapi https://folio-snapshot-okapi.dev.folio.org". The result:
- Set up second network interface that will be used as internal one for ssh and the other similar stuff (it uses static IP address so you don't need to check out what next IP it has via DHCP):
- IP: 192.168.2.2/24, Netmask 255.255.255.0, DNS: 192.168.2.1/24;
- Put VM's IP into host machine's hosts file and vice versa.
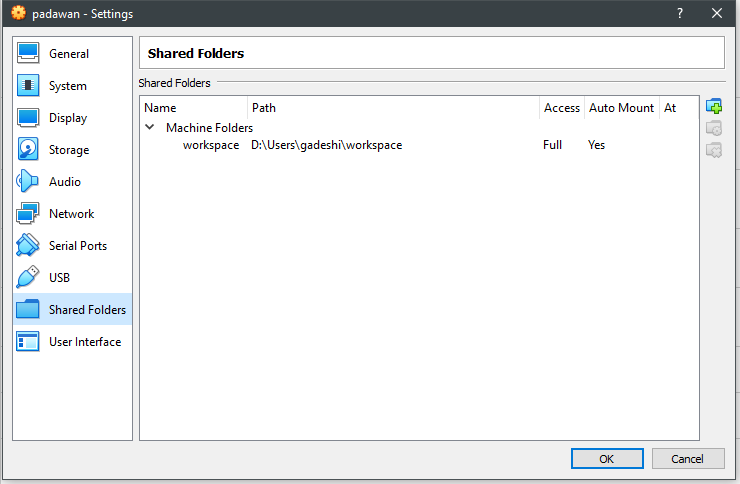
- Set up Projects shared directory:
- Point VirtualBox sharing facilities to your projects folder (D:/Users/username/workspace in this example) which we are going to share with our VM (see Figure 9);
Create empty directory for the mount point and give it access rights of your VM user (not root!):
$ sudo mkdir /usr/www
$ sudo chown -R username:usergroup /usr/www
$ sudo chmod -R 775 /usr/www
Mount shared folder into your directory of choice (/usr/www in my case) using fstab (/etc/fstab) through vboxsf virtual file system (as root):
fstab exampleUUID=9a4b3832-6258-11e9-859a-080027de5c74 / ext4 defaults 0 0 /swap.img none swap sw 0 0 workspace /usr/www vboxsf auto,uid=1000,gid=1000 0 0 # //192.168.2.1/workspace /usr/www cifs rw,users,credentials=/etc/samba/credentials/sith.local,gid=1002,dir_mode=0775,file_mode=0775 0 0
Check newly created mount point via the following command:
$ sudo mount -a
this will re-mount all the existing mount points figured out in fstab and in the case of success you will be able to change to your new shared directory and check its contents and access rights using the following commands:
$ cd /usr/www
$ ls -las
So this way now you are capable of BigTest tests development in the following way:
- Write tests on Windows host machine as usual.
- Switch your VM project to your current git branch and pull the latest changes.
- Commit and push tests to git repo from host machine or copy tests directory to your VM projects folder (/home/username/workspace/project_name in my case) to avoid using git for now.
- Run and debug your tests on VM.
- Copy ready to use tests back to your host machine project folder for commit or commit them from VM directly.
Illustrations
1 - VM Settings: Summary:
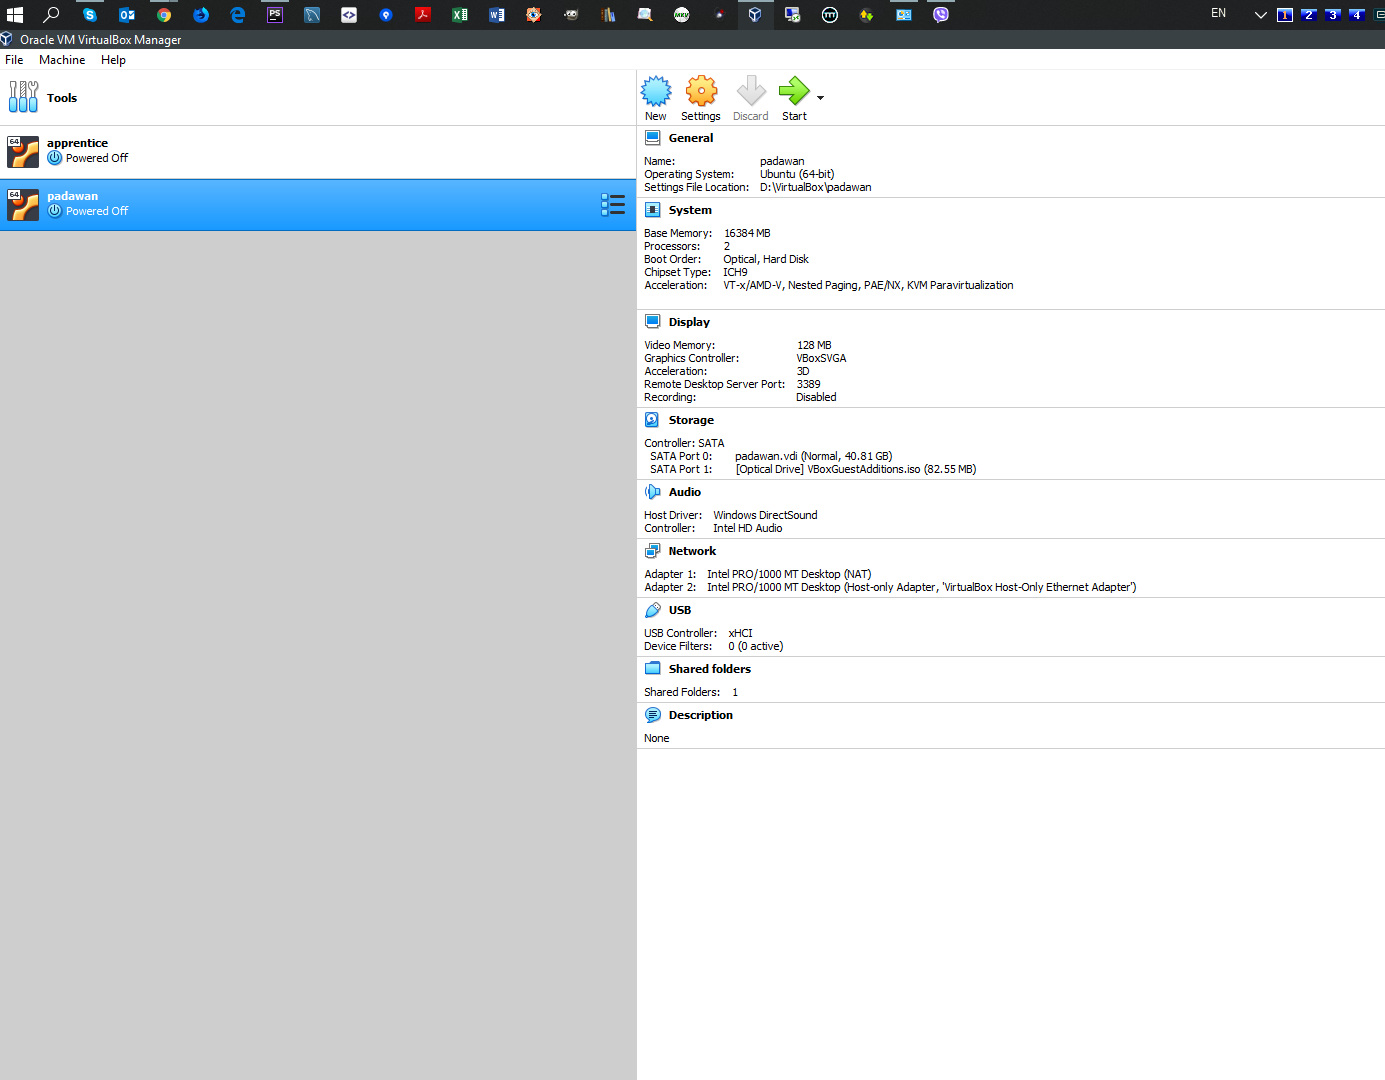
2 - VM System Settings - Motherboard:
3 - VM System Settings - Processors:
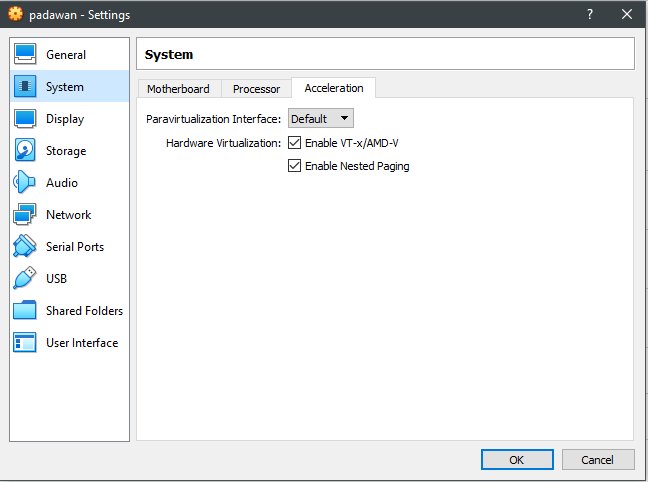
4 - VM System Settings - Accelerations:
5 - VM Settings - Display:
6 - VM Settings - Storage:
7 - VM Settings - Network 1:
8 - VM Settings - Network 2:
9 - VM Settings - Shares:
10 - VM Settings - Host only networks: