Skip to end of banner
Go to start of banner

How to automate redeployment of backend modules in Vagrant

Skip to end of metadata
Go to start of metadata

You are viewing an old version of this page. View the current version.

Compare with Current View Page History

« Previous Version 4 Next »

This guide is based on How to automate new modules’ registration within folio/testing-backend Vagrant box.  It provides shell scripts for re-registering/redeploying modules in folio/testing Vagrant box.

The goal is to set up a script that will be run after module is built. The script will copy all necessary files, build docker image, register and deploy it inside of Vagrant box.

This guide assumes that Okapi already has a version of the same module registered and deployed. The script will only replace old module with new one, it won't register module from scratch.

Additionally version of new module has to be greater or equal to the version of already deployed module

 Script preparation
  1. Copy deployment_scripts folder from following archive into vagrant root folder (directory with Vagrantfile)
    deployment_scripts.7z
  2. Edit file copy_jar_and_deploy.sh:
    set variable VAGRANT_PATH to vagrant root folder
    set VAGRANT_VM_NAME to the name or id of vagrant VM (you can get it by running "vagrant global-status", normally it will be "testing" or "testing-backend")

  3. Edit file make_docker_directory.sh to set variable VAGRANT_PATH to the same value as in copy_jar_and_deploy.sh
 Creating directory to build docker image

This step needs to be done only once for each module.
To build docker image we need to create a separate directory with Dockerfile for each module. This directory has to be placed in vagrant root folder, so that it is accessible from inside vagrant vm.

To create docker directory:

  1. run "make_docker_directory.sh", 
  2. Specify name of directory (e.g. mod-notes)
  3. Specify debug port that will be exposed by deployed module
  4. Check that directory is created in vagrant root folder
  5. If necessary, modify docker-DeploymentDescriptor.json
 Redeploying module
  1. Go to the directory with module:

    git clone --recursive https://github.com/folio-org/mod-notes.git
    cd mod-notes
  2. Build module with maven:

    mvn clean install
  3. Make sure that version of built module is greater or equal to version of already deployed module, script uses "/_/proxy/tenants/diku/upgrade" endpoint for redeployment, so redeployment will only work if new version is greater than old version. (You can temporarily set the version to be greater by modifying pom.xml and rebuilding module)
  4. run copy_jar_and_deploy.sh, pass name of jar file, name of docker directory and path to module:

    D:\\myFolder\\folio\\folio-ansible\\deployment_scripts\\copy_jar_and_deploy.sh mod-notes-fat.jar mod-notes D:\\myFolder\\folio\\mod-notes

    Alternatively, if you don't pass module folder path then it will default to current folder:

    cd mod-notes
    D:\\myFolder\\folio\\folio-ansible\\deployment_scripts\\copy_jar_and_deploy.sh mod-notes-fat.jar mod-notes
 Redeploying from Intellij Idea
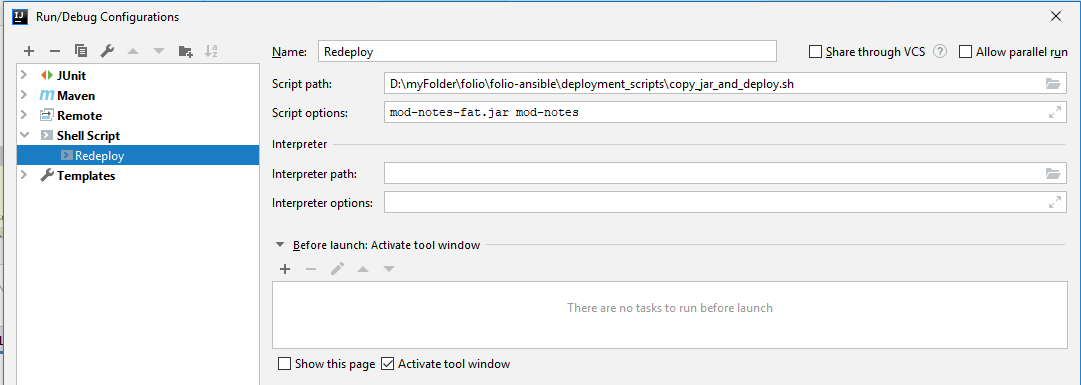
If you are using latest version of Intellij Idea then use Shell Script Run configuration: 
  1. Go to Run - Edit Configuration
  2. Add Shell Script configuration with path to copy_jar_and_deploy.sh, specify jar filename and docker directory as parameters:

If you are using older Intellij Idea then use BashSupport plugin https://plugins.jetbrains.com/plugin/4230-bashsupport to create similar Run configuration

 Accessing debug port

Each redeployed module exposes debug port that is specified in docker_dir/DEBUG_PORT.txt. To access debug port you need to forward it in Vagrantfile by adding following string: 

config.vm.network"forwarded_port", guest:9555, host:9555

You can forward a range of ports by using a for loop: 

    for i in 9555..9575
      config.vm.network :forwarded_port, guest: i, host: i
    end


  • No labels